Manual contents
5. Settings App
On this page
Input / Output
This section guides you through configuring the device's audio input/output. In the left navigation bar of Settings, select the "Input/Output" icon to enter the main I/O screen (see screenshot: I/O-1). Here you can choose the audio signal's input source (where sound comes from) and output port (where sound is sent).
Input Port
Select the source of the audio signal here.
Local
- When selected, the device acts as a digital player.
- The device plays audio files stored in internal storage, removable storage, or the network (NAS / online cloud / streaming).
USB-B
- After selecting USB-B as the input source in I/O settings, the system jumps to this screen (see screenshot: I/O-2). The device pauses internal playback and instead receives digital audio from another front-end device (transport, PC, phone, etc.) via USB for decoding.
- Connect another front-end device via a USB-B cable to use this device as a pure DAC.
- Status indicator (top-left):
- Shows [icon] USB-B input, indicating the device is passively receiving signal.
- Volume display (center, large):
- Shows the current output volume (e.g., -64 dB in the screenshot).
- Here you can adjust volume with the physical knob or remote (i.e., the device's preamp volume control is enabled).
- Audio spec display (center, small):
- Shows e.g. PCM 44.1 kHz (as pictured).
- This field reports the sample rate and format recognized by the app from the connected front-end device (PC, phone, or tablet).
- Use: compare this app-reported status with the front-end playback settings when troubleshooting. It is not by itself proof of the final hardware output; confirm the complete active signal chain and the receiving device when that distinction matters.
- Action buttons (bottom):
- "Return to Local input": tap to disconnect from the PC/phone/tablet and switch back to the internal player, where you can continue using the on-screen menus or play local music.
- Hardware steps:
- Connect: use a USB A-to-B cable (typically a printer-cable shape). Insert the square Type-B plug into the device's rear USB-B port, and the other end into the front-end device's USB port (use an OTG adapter to connect a phone).
- Start playback: play music on the PC/phone/tablet; you'll see the "PCM xxx kHz" value change with the format, and sound comes from the rear speakers.
FAQ
- "No signal" or sample rate not shown: check the USB cable is seated firmly.
- DSD shows as PCM: if you play a DSD file on the front-end but here it shows a high PCM rate (e.g., 176.4 kHz), it means DoP transcoding or PCM output is happening — normal. To show DSD, check the front-end device's "DSD output mode" setting.
Output Port
Here you select which rear device the audio signal is output to (built-in DAC, or an external decoder via an output port). Tap the corresponding icon to activate; tap the gear icon at the icon's top-right (if present) for advanced settings.
(1) XLR / RCA (Analog Output)
This option decodes the digital signal to analog and outputs via the rear XLR/RCA (single-ended) connectors, directly to an amplifier or active speakers.
- Visibility: shown only when the device has a decoder board installed. If your device has no decoder module, this icon is hidden.
- Details:
- Format display: shows supported PCM bit depth and DSD spec (e.g., PCM 32 bit, DOP512).
- PCM max sample rate: up to 768 kHz.
- Digital Filter: tap the dropdown to switch filter modes (e.g., "Linear Phase Fast Roll-off") to fine-tune the sound.
(2) USB-DAC (External USB Audio Output)
This option outputs the digital signal via USB to an external USB decoder (standalone DAC).
- Dynamic detection: plug-and-play detection.
- Available: selectable and highlighted only when a valid USB audio device is detected (see screenshot 3).
- Unavailable: greyed out if no USB device is connected.
- DSD output mode:
- Native: sends DSD directly when the source, player settings, output path, and external decoder all support it. Whether playback remains bit-perfect depends on the complete signal chain and any active processing.
- D2P (DSD to PCM): converts DSD to PCM. Choose this if your external decoder does not support DSD decoding.
- DOP (DSD over PCM): transmits DSD within PCM frames. For older decoders that only support DOP.
- Note: with digital volume control on, the system may limit DSD output to D2P mode. If you need unattenuated DSD pass-through, verify the full chain and its settings first, then use the connected amplifier or DAC volume with a low initial level.
- Connection detection: if no external USB sound card is detected, tapping this option pops a prompt (see screenshot: I/O-3).
(3) Optical (光纤)
Outputs digital signal via the optical port.
- Spec limit: limited by optical bandwidth — PCM up to 192 kHz; DSD typically only DOP64 or D2P.
- Setting: switch DSD output mode between D2P and DOP.
(4) HDMI Audio
Transmits audio via HDMI (typically to an AVR or decoder that supports HDMI audio input).
- Spec: PCM up to 192 kHz.
- Setting: D2P and DOP output modes available.
Common Prompts & Troubleshooting
Prompt: "No corresponding audio output port detected! Please check!"
- When: when you tap an output port (e.g., HDMI Audio or USB-DAC) but the device detects no physical connection or handshake fails.
- Solution:
- Check the cable is seated.
- Confirm the receiving device (external decoder, amp) is on and on the correct input.
- If USB DAC, try re-plugging the USB cable.
Network
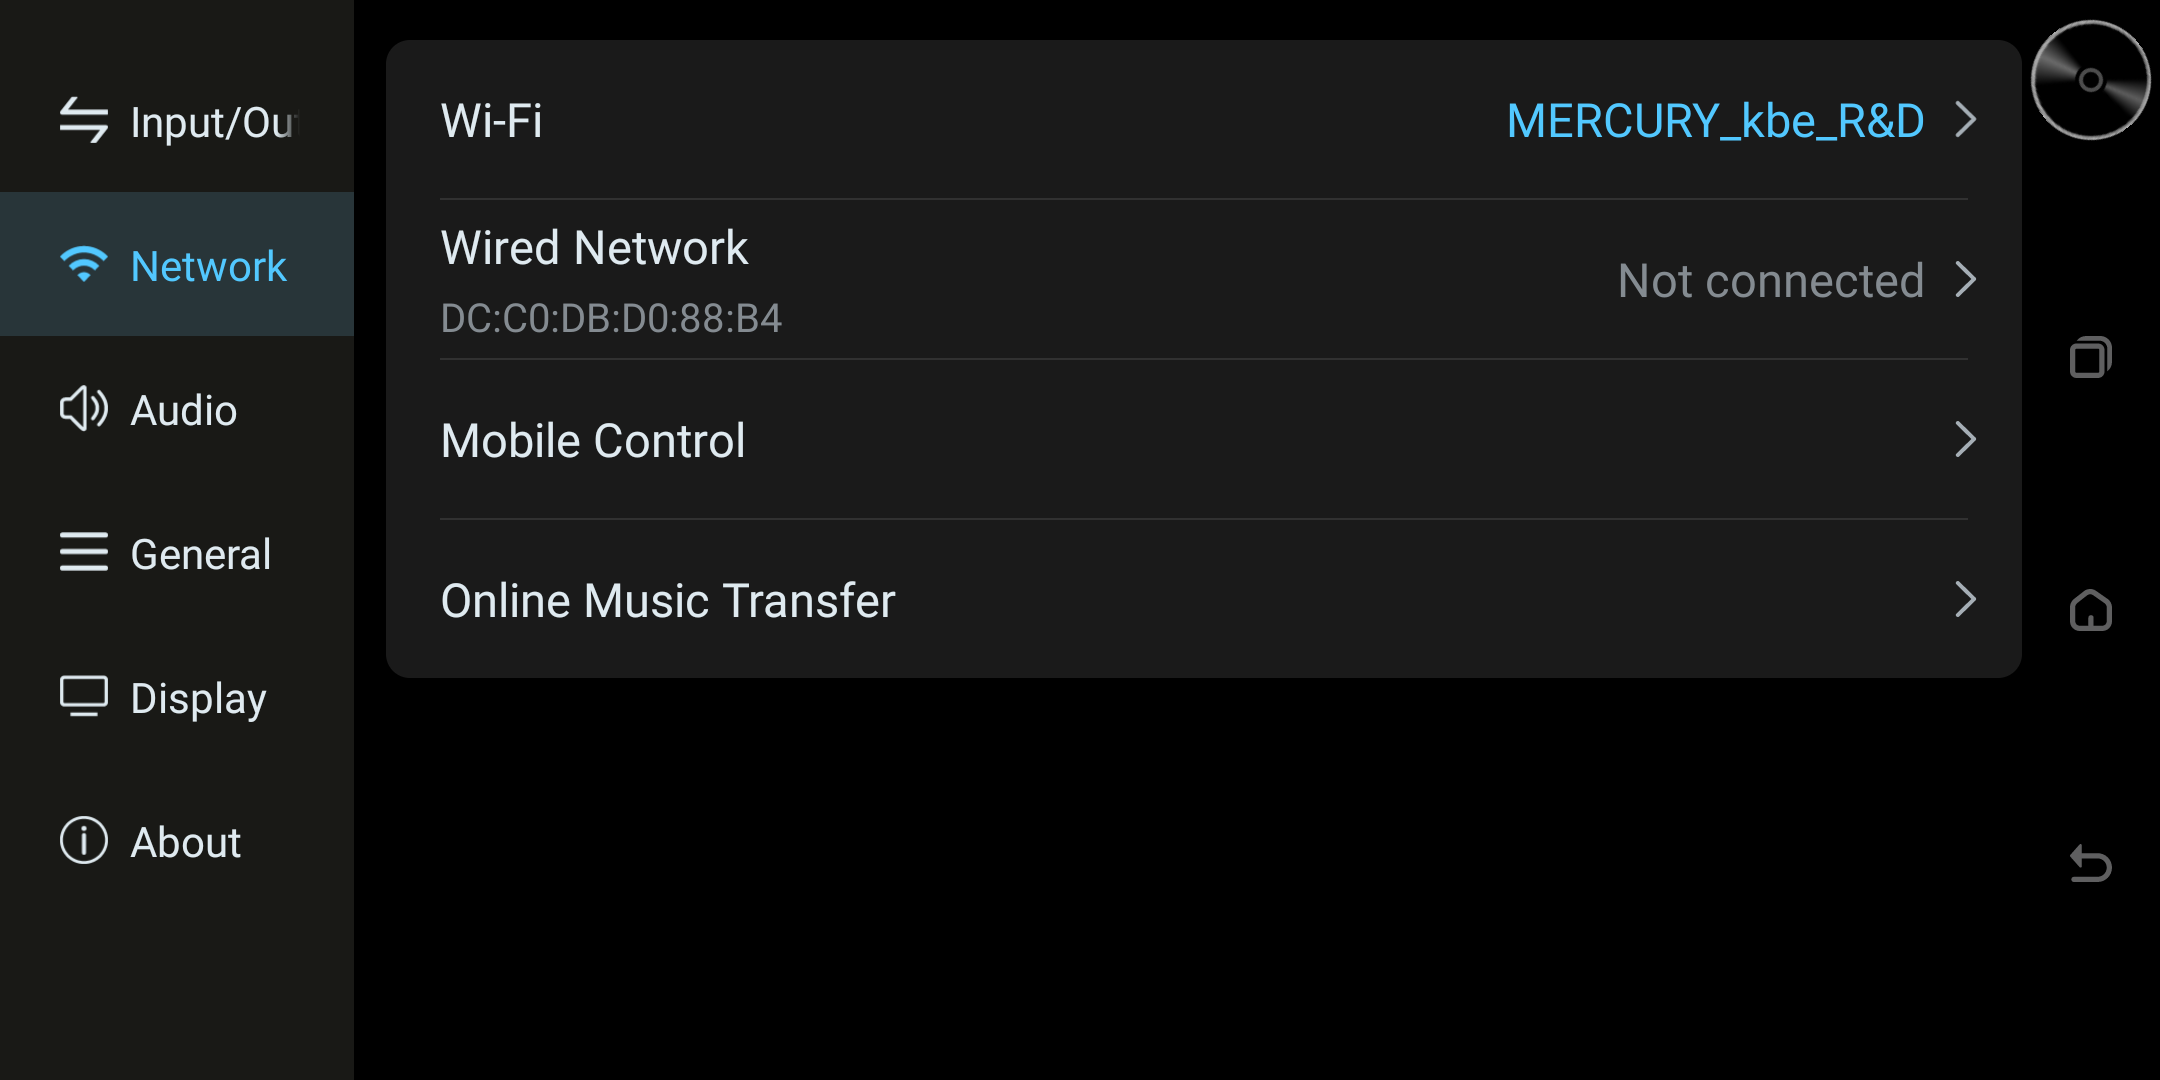
This section guides you through configuring the device's network connection, phone control, and wireless file transfer. In the left navigation bar of Settings, select the "Network" icon to enter the network settings main screen (see screenshot: Network-1). Here you can:
- WiFi settings
- Wired network settings
- Phone control
- Wireless file transfer (Online Transfer)
WiFi Connection (Wireless)
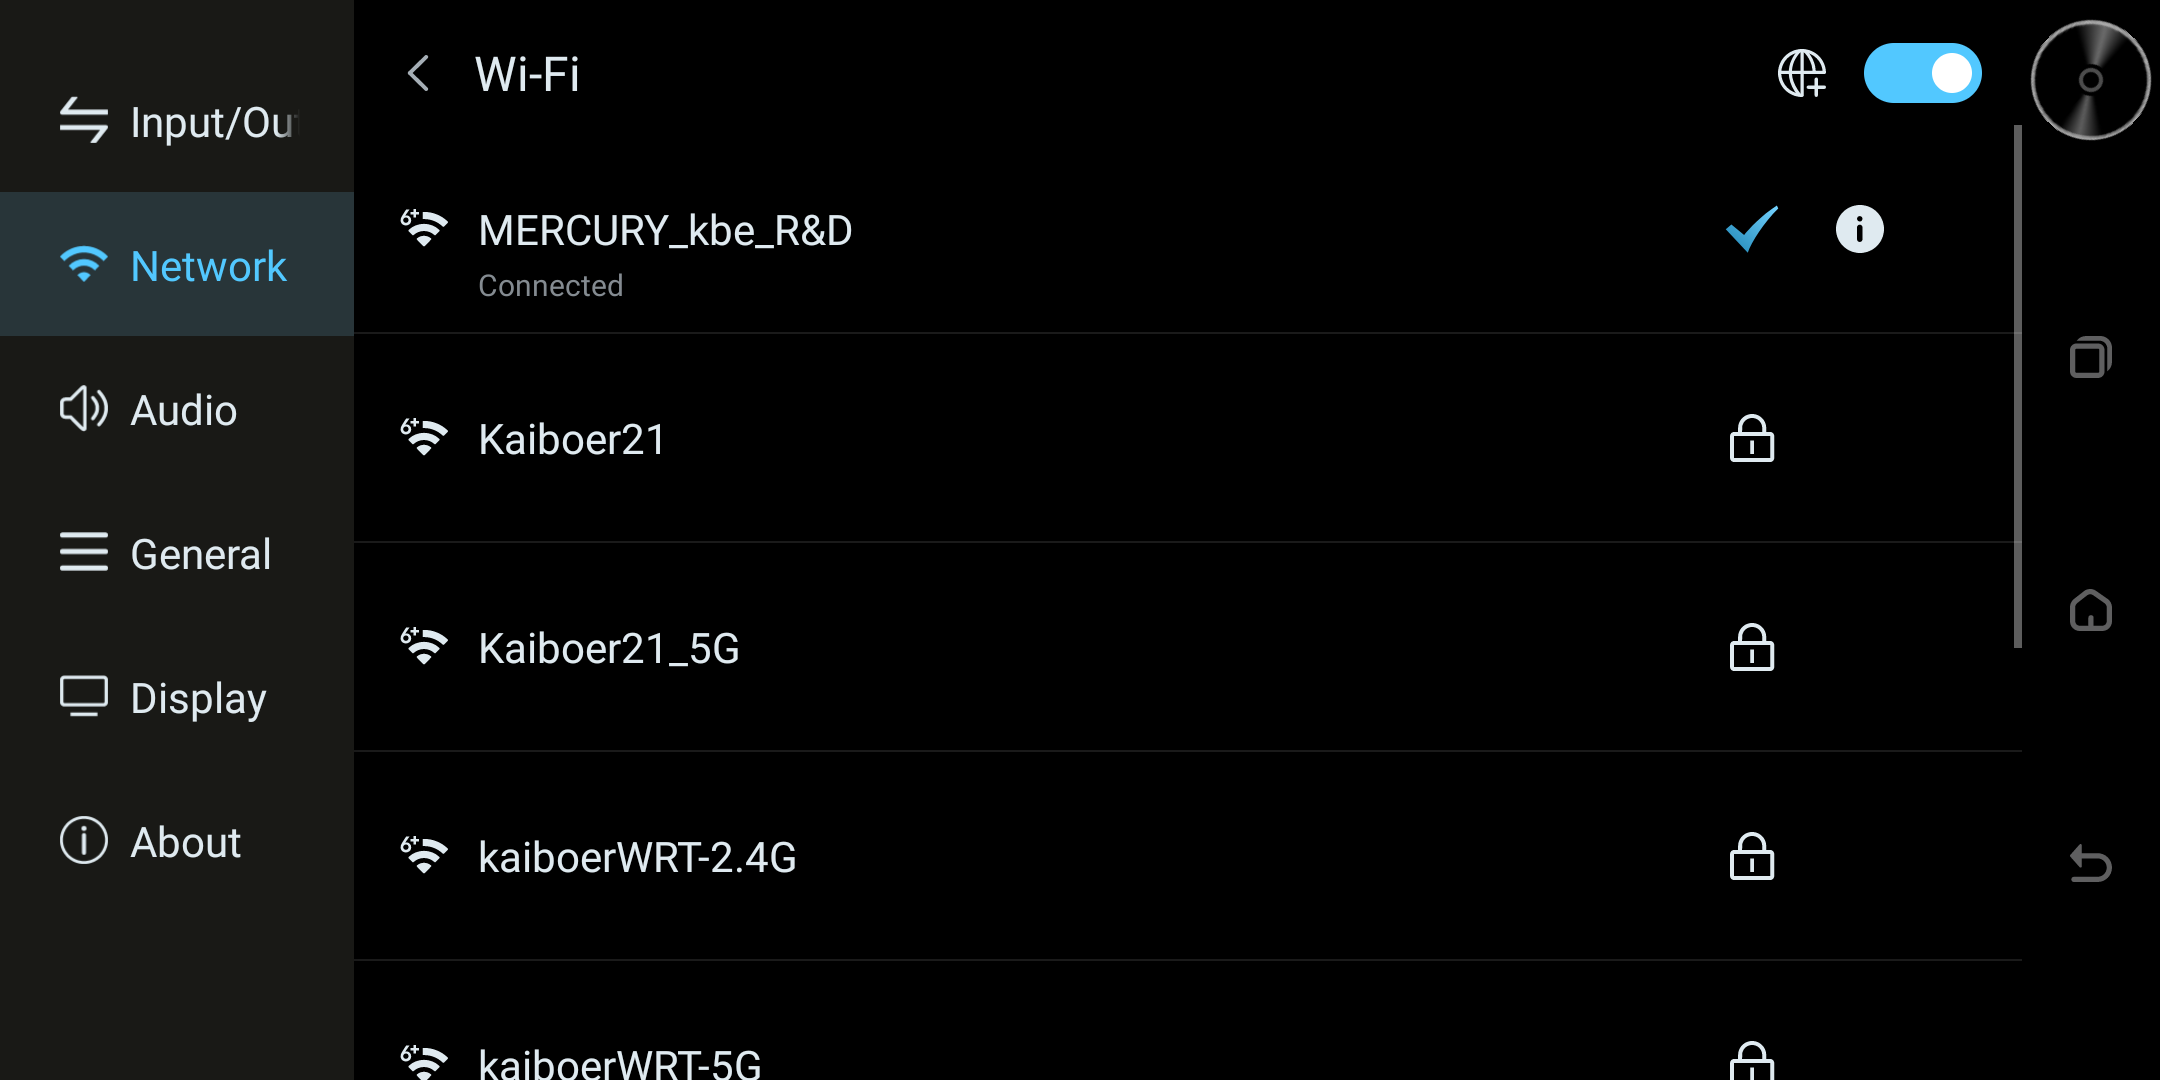
If you have a wireless network, connect as follows:
- Enable WiFi: enter WiFi, tap the top-right switch to "On" (blue).
Select network: the player scans for nearby Wi-Fi networks. Select your network name, enter its password, and connect. A blue check mark indicates the selected connection in the illustrated interface.
- Advanced / manual (if needed): if you must specify encryption or add a hidden network, a security settings popup appears (see screenshot: Network-3). Choose None, WEP, WPA/WPA2-Personal, or WPA3-Personal. Tap Done when finished.
Wired Network
If connecting via cable, use this option:
- Connect cable: ensure the cable is plugged into the device's network port.
- View status: enter "Wired Network" (see screenshot: Network-4). Connection status "Connected" means the physical link is good (shown as "Disconnected" in the screenshot).
- DHCP (auto IP): keep DHCP on (blue) so the router assigns IP/gateway/DNS automatically.
- Manual IP: to fix the IP, turn DHCP off and enter IP, subnet mask, gateway, and DNS manually.
- MAC address: the
DC:C0:...shown is the device's physical address; if the router has MAC filtering, whitelist this address.
Phone Control
Lets you use a phone app instead of the physical remote.
- Enter menu: tap "Phone Control" on the main screen.
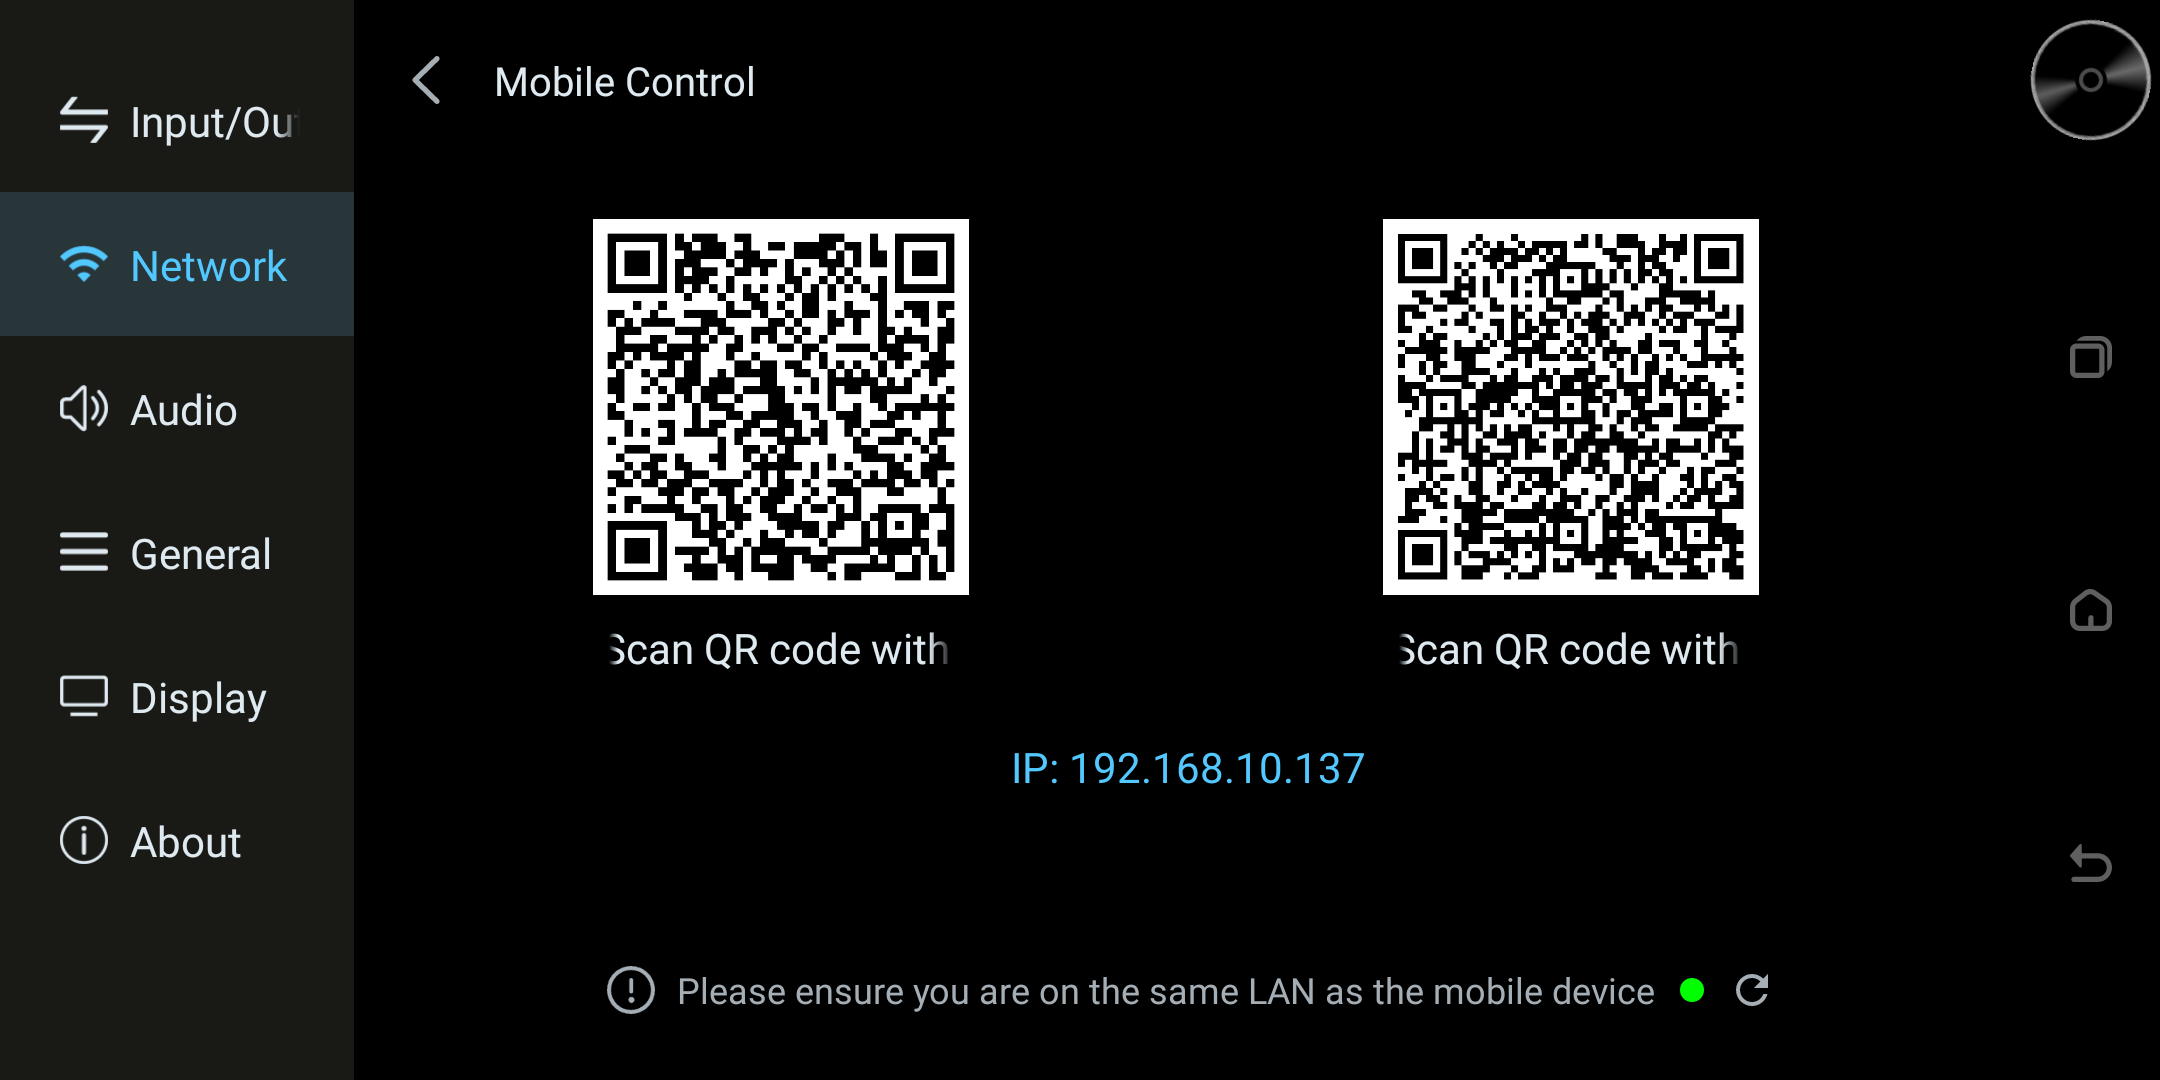
- Download app: scan the "Scan to download app" QR code on the left (see screenshot: Network-5) to install the control software.
- Connect device:
- Prerequisite: the phone and device must be on a reachable local LAN. The device may be wired while the phone uses Wi-Fi when the router allows wired and wireless clients to communicate.
- Open the phone app, scan the "App scan to connect device" QR code on the right to pair. Or enter the IP shown at the bottom of the screen (e.g.,
192.168.31.141) directly in the app. - WiFi & wired: before using Kaiboer products, ensure the network is connected. The DMP-K series supports both wired and WiFi; WiFi settings are at Settings menu > "Network" > "WiFi".
Connection Status Indicator (Important)
To the right of the bottom text "ensure the mobile device is on the same LAN", there is a round status indicator reflecting the phone-control service in real time:
- 🟢 Green (service normal): the device's control service started successfully and network communication is normal. The phone app can search and connect normally (device is "waiting to connect").
- 🔴 Red (service abnormal / cannot connect): the control service failed to start, or the network is disconnected. The phone app cannot find or connect. Troubleshoot:
- Check network settings: go back one level and confirm WiFi or wired shows "Connected".
- Use the reset button: if the network is confirmed good but the light stays red, tap the "Refresh/Reset" icon (↻) to the right of the indicator. (This forces a restart of the phone-control background service and re-detects the network.)
- Check LAN environment: if still red after reset, check the router for "AP isolation" and confirm phone and device are on the same router's network.
Wireless File Transfer (Online Transfer)
Used to wirelessly transfer music files from a PC or phone into the device's storage.
- Enter menu: tap "Online Transfer" on the main screen.
- Default storage path: uploaded files are saved to
/storage/emulated/0/Musicby default. - Transfer methods:
- For the detailed procedure, see the "5.1 Settings – Online Music Transfer" sub-page. Use file transfer only within a trusted local LAN.
- Browser (PC or phone): within the trusted local LAN, enter the address shown on the device (for example,
http://192.168.31.141:2122) in a browser or use the displayed QR code. Do not expose this transfer page to the internet. - SMB share (recommended for PC): use the current device IP shown in Online Music Transfer. On Windows, enter
\\<device-IP>in File Explorer; on Mac, usesmb://<device-IP>in Finder → Go → Connect to Server. Choose Guest only when current device configuration offers it; otherwise use configured credentials.
⚠️ Notes:
- Reachable LAN required: Phone Control and Online Transfer require the phone or PC and device to reach each other on the local LAN. A common Wi-Fi name is not required; wired-and-Wi-Fi use can work when router isolation is disabled.
- IP may change: under DHCP, the device IP may change after reboot. If connection fails, re-enter Network settings to check the latest IP.
Audio
This section guides you through configuring audio functions. In the left navigation bar of Settings, select the "Audio" icon to enter the audio settings main screen, where you can deeply customize sound output and playback behavior.
Max Volume
- Description: caps the system's global maximum output level, preventing speaker or hearing damage from accidental loud volume.
- ⚠️ Prerequisite: this slider is draggable only when "Digital Volume Pass-through" is OFF (device volume adjustable). When pass-through is ON (fixed digital volume), the slider is locked (greyed) and digital attenuation is unavailable; use the rear device for volume.
DSD Fixed Sample Rate Output
- Description: sets the output sample rate when converting DSD to PCM in D2P (DSD to PCM) mode.
- Options: dropdown to choose the rate (e.g.,
PCM_192000= 192 kHz shown). - Advice: if your rear decoder (XLR/RCA) does not natively decode DSD, or you want coaxial/optical high-spec output, choose the rate per your decoder's max support.
Audio Compatibility Mode
- Description: based on the audio capability of the USB/HDMI rear device, automatically lowers the output sample rate to improve compatibility.
- Note: hidden by default; appears only when some firmware/models detect a limited rear device.
MQA Unfold
- Description: when on, unfolds MQA-encoded audio, restoring the hi-res information layer wrapped in the file, raising the output sample rate (e.g., 44.1 kHz source unfolded to 88.2 kHz) for detail, space, and dynamics closer to the master.
- How: find the "MQA Unfold" switch in Audio settings to toggle.
- ⚠️ Compatibility: when off, locks the output sample rate to avoid some DACs not supporting the unfolded high rate.
- Scope: only affects 44.1 kHz / 48 kHz series, stereo MQA sources; non-MQA unaffected.
Hi-Res Upsampling Engine
- Description: real-time upsampling or DSD remodulation of digital audio before playback to improve detail, density, and listenability. Three modes — "Original Pass-through (off) / PCM high-precision upsampling / DSD real-time remodulation" — only one active at a time.
- Modes:
- Original Pass-through (off): keeps the source sample rate, no upsampling or DSD modulation.
- PCM high-precision upsampling: interpolates PCM to a higher rate; choose 2× / 4× / 8× and Kaiser / Blackman-Nuttall.
- DSD real-time remodulation: remodulates PCM to 1-bit DSD128 output in real time.
- ⚠️ Effect: all three take effect after track switch. If PCM upsampled rate exceeds 384 kHz or the output device doesn't support it, or the DSD remodulated source/channel isn't supported, the system auto-keeps the original rate pass-through.
- Details: for full steps, parameters, and FAQ, see the "5.2 Hi-Res Upsampling Engine" sub-page.
Playlist Max Tracks
- Description: limits the maximum songs allowed in the current play queue (default 1000 shown).
- Usage: tap the
**-**or**+**to adjust (±500 each, range 500–5000). - Purpose: prevents system slowdown/lag from loading too many songs at once (e.g., adding an entire drive).
Volume Fade In/Out
- Description: fades volume in/out when switching tracks to avoid clicks on some decoders.
- Note: only effective on analog (XLR/RCA) output; hidden by default, appears on some firmware.
Integer Volume Display
- Description: toggles the volume number display style.
- Styles: On — integer volume (0–64); Off — dB volume (−64–0 dB). Only changes on-screen form, not actual level.
Digital Volume Pass-through
- Description: controls whether digital fixed-volume (pass-through) is enabled when outputting digital signal via USB/coaxial/optical/HDMI.
- On (fixed digital volume): disables device-side digital attenuation and locks device volume. In a compatible chain with no active processing, this may preserve source samples; use the rear amplifier or active-speaker volume, starting low and raising it gradually.
- Off: device (remote) can adjust volume.
- Advice: enable fixed digital volume only after confirming the complete chain is compatible and no processing is required. It may preserve source samples in that situation; control volume on the rear device, starting low and raising it gradually.
Auto-Mute on Output Switch
- Description: when switching between audio output ports (e.g., HDMI to USB DAC), the system mutes briefly.
- Purpose: a protection feature to eliminate switch pops/clicks that could damage rear equipment. Keep on, or decide by ear.
Jump to Play Screen on Play
- Description: decides whether tapping a song auto-switches to the full-screen "Now Playing".
- On (blue): tap a song → full-screen cover and lyrics immediately.
- Off: tap a song → starts playing but stays on the file list for browsing/adding more.
Add Single to Playlist Only
- Description: decides the add logic when tapping a song.
- On: tapping adds only that one song to the queue.
- Off (greyed, as shown): tapping adds all songs in the current folder or playlist to the queue, starting from the tapped song.
Cross-Folder Playback
- Description: allows the player to auto-play across folders.
- On: when a folder finishes (or you skip to its end), auto-jump to the next sibling folder and continue.
- Off (greyed): stop after the current folder, or loop within it.
Memory Play (Resume)
- Description: resume playback from the last song and position after power off/restart.
- On: reopening the music app restores the last song and progress.
- Off (greyed): must manually select each time.
Anti-Pop Relay on Track Switch
- Description: eliminates track-switch pops via a hardware relay.
- Note: comes with a slight mechanical "click" when acting; shown only when the device has a decoder board (relay equipped).
VU Meter Algorithm
- Description: switches the VU meter response.
- Options: Real-time level (follows music instantly); Analog level (simulates analog amp needle inertia, averaging short-term levels).
General
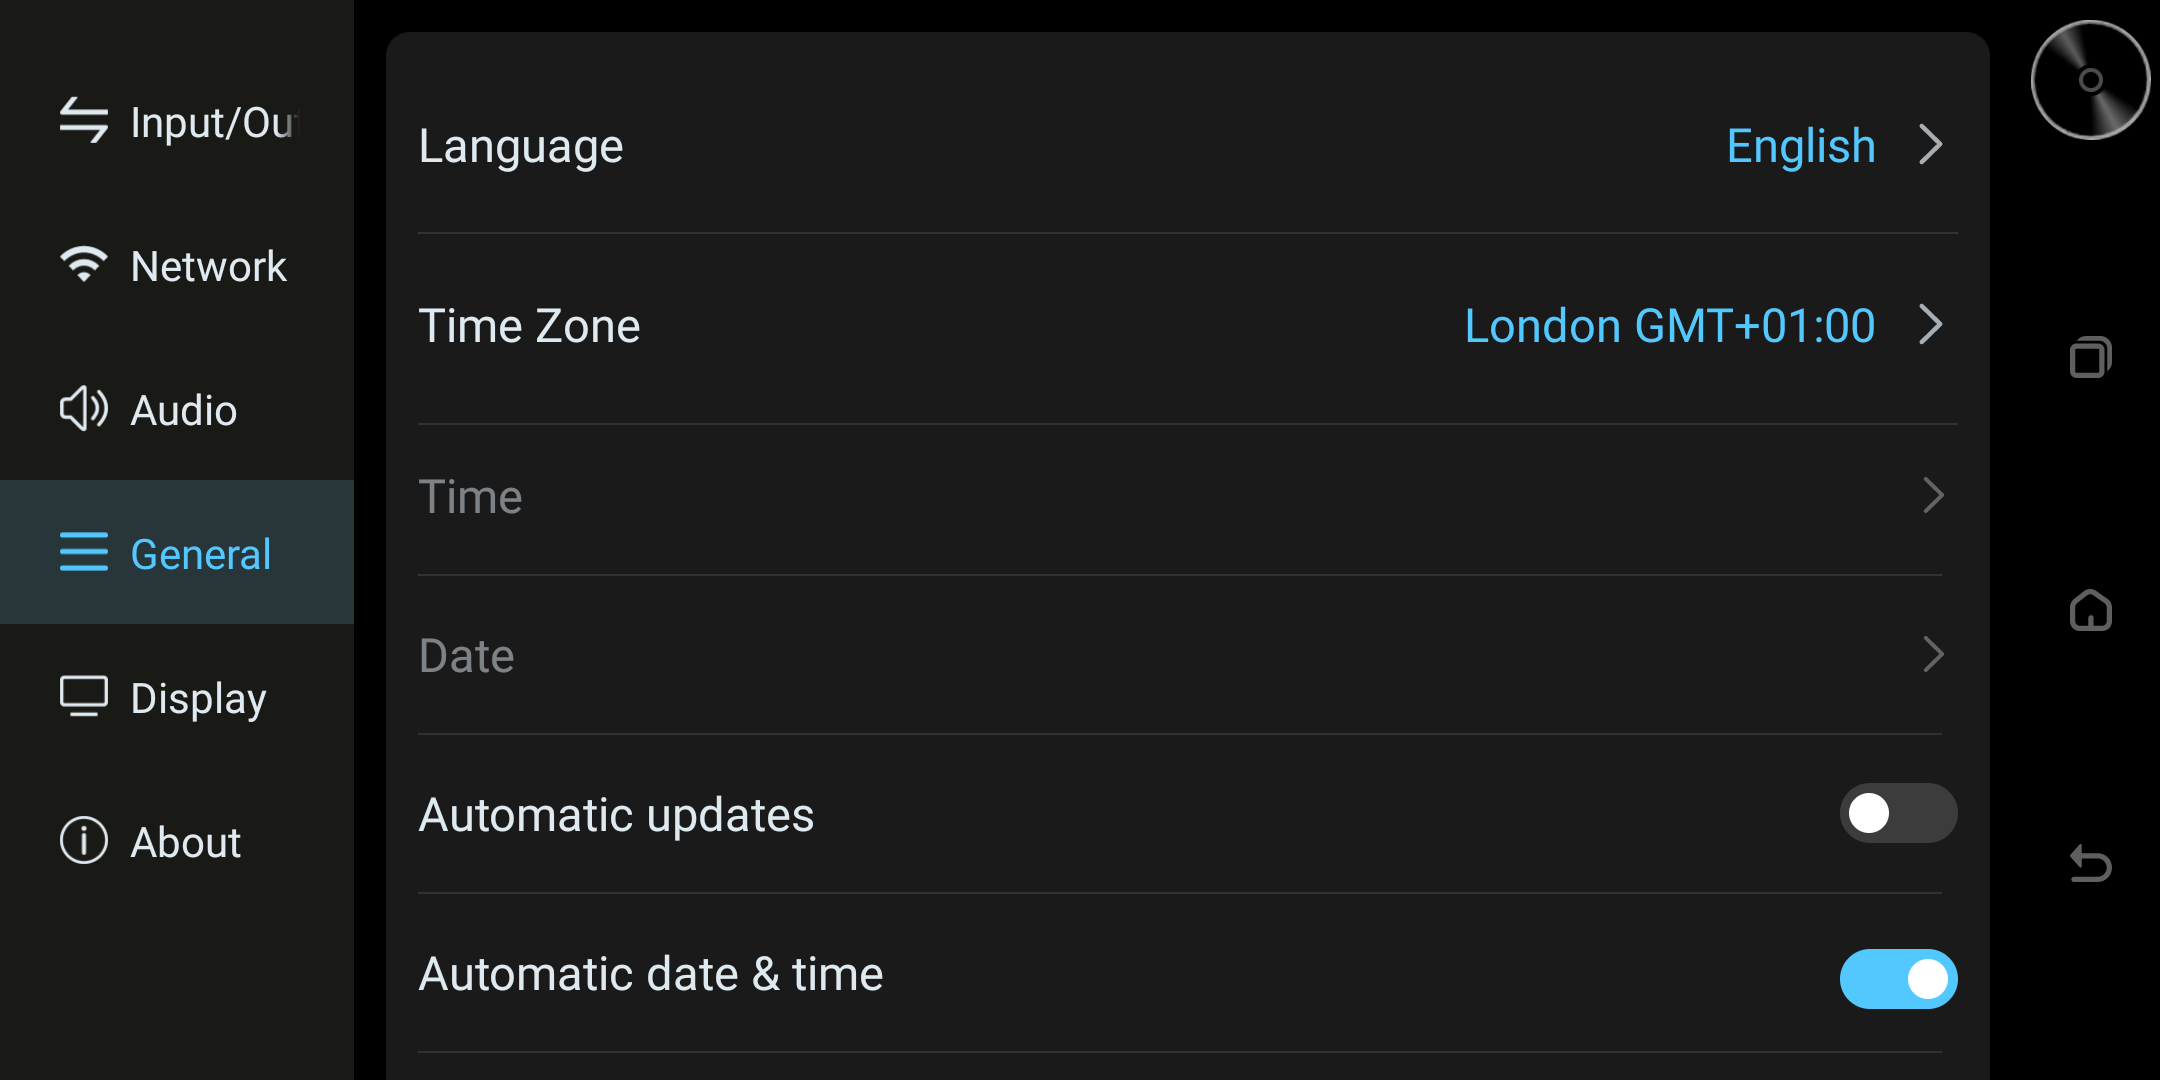
This section guides you through general functions. In the left navigation bar of Settings, select the "General" icon to enter general settings.
Language
- Description: switch the system display language.
Tap the language dropdown and select English, or another preferred language. The interface updates after the selection.
Time Zone
- Description: set the device's geographic time zone for accurate time.
- How: dropdown to choose. China users: choose "Shanghai" or "Beijing". Overseas: choose your actual zone.
Auto Date & Time
- Description: whether the system auto-syncs time via network or you set it manually.
- States: On (blue, as shown, recommended): after connecting, NTP auto-syncs; accurate, no manual work. Off (greyed): no network sync; the "Time"/"Date" options above become clickable for manual input.
Time / Date
- Description: manually adjust the displayed time and date.
- Note: only available when "Auto Date & Time" is Off.
USB Function Switch (Core)
Critical — determines the role of the rear (or side) OTG-USB port. It's bidirectional and must be switched per use.
Host Mode
- When: connecting a USB drive, external HDD, USB mouse/keyboard, or USB DAC (external decoder).
- Principle: the player acts as "computer", reading/controlling inserted devices.
- Action: if you plug in an HDD but the system can't see it, ensure this is switched to Host.
OTG Mode (Device / Transfer)
- When: connecting the player to a PC/phone/tablet to copy music files into internal storage (or mounted HDD).
- Principle: the player acts as "external HDD", recognized/read by the PC/phone/tablet.
- Action: before connecting with a double-headed USB cable (Type-A to Type-A or Type-C), switch to OTG mode first, otherwise the PC/phone/tablet won't recognize the device.
⚠️ Advice:
- For daily listening and external-HDD playback, keep Host mode.
- Only temporarily switch to OTG when copying songs via cable from a PC.
Display
This section guides you through display functions. In the left navigation bar of Settings, select the "Display" icon.
Screen Brightness
- Action: drag the blue slider to adjust backlight brightness.
- Advice: lower in dim environments to protect eyes; raise in bright environments for clarity.
Screen Sleep Timeout
- Function: time of inactivity before the screen auto-turns off (black, sleep).
- Options: dropdown to choose (e.g., 5 hours shown).
- Purpose: reasonable timeout extends screen life and saves power.
HDMI Resolution
- Function: when connected to TV/monitor via HDMI, set the output resolution here.
- State: shown as "Not connected" (no external display detected). Connect first, then choose 4K/1080P etc.
Screensaver Style (screenshot: Display-2)
When playing or idle, the screen shows a screensaver. Tap "Screensaver Style" on the main screen to enter.
- Choose: tap your preferred style card; the selected one shows a "In use" tag.
- Styles:
- Screen Off: backlight fully off, pure black. Pure listening (no light distraction, great for night/all-black); protects screen from OLED/LCD burn-in; reduces internal EMI for cleaner sound (audiophile view). Wake by tapping screen or pressing remote/body key.
- Digital Clock: minimal; large flip-style time + date/weekday on black. Good as a desktop clock.
- Retro Clock: warm-tone glow-tube classic clock; nostalgic; cozy for night/bedroom/living room.
- Spectrum: colorful audio spectrum reacting to music in real time. Tech vibe, for younger users.
- VU Meter: retro analog amp needle VU (L/R) swinging with loudness. Nostalgic, loved by audiophiles.
- Vinyl: classic spinning vinyl animation with tonearm. Elegant, slow retro ritual.
- Floating Lyrics: scrolling current lyrics on screen with spectrum/cover.
- Spatial Lyrics: 3D visualized lyrics flowing in screen space.
Ambient Light (screenshot: Display-3)
Customize the knob light color and dynamic effects. Tap "Ambient Light" in Display settings.
- Master switch: top-right switch (blue on / grey off). Turn off if the light is distracting or affects sleep.
- Reset: top-right reset button restores factory default.
- Color: drag the ring on the color bar to choose any color (warm yellow shown); the body light syncs in real time.
- Brightness: drag the bar to adjust ambient-light brightness.
- Music mode: the dynamic effect during playback:
- Default: fixed color/brightness, steady on.
- Breathing: slowly brighten/dim like breathing.
- Cycle: auto-cycle through the color spectrum.
Font Size
- Action: enter to choose Small / Medium / Large / Largest.
- Advice: larger when viewing from far (TV cabinet); smaller up close for finer detail.
About
This section guides you through the About functions — view hardware config, network params, do system/app upgrades, and factory reset if needed. In the left navigation bar, select "About".
Device Name
- Edit: tap the pencil icon to customize the device's LAN display name.
- Purpose: easier to identify this device when using phone casting (AirPlay/DLNA) or PC shared-file access.
Hardware Highlights:
- Processor: ARM Cortex-A55 quad-core for smooth system.
- Pure OS: clean audio-specific OS, less interference.
- Linear power supply: high-cost linear PSU inside — the foundation of hi-fi.
- Storage: 8 GB RAM + 64 GB internal storage for lag-free large music apps.
- Note: the above processor/storage are example configs; actual hardware follows the model on the rear nameplate and "About" screen; varies by model.
Network Identity:
- IP address: for phone-app connection or web control.
- MAC address: device's physical unique ID, for router whitelist etc.
System Upgrade & Version Management
Tap the "Software Version >" arrow on the main screen to enter the "System Upgrade" submenu (screenshot: About-2).
Online Update Check
- Shows the current system version (e.g., 1.1.17). Tap the bottom blue "Check Update" button; the system queries the server for new firmware. If found, follow prompts for OTA.
View App Component Versions
- In System Upgrade, tap the blue text link "App Version". A list pops up (screenshot: About-3) showing core component versions:
- KBE Device Control: underlying control service version.
- TIDAL, etc.: other built-in streaming app versions (varies by firmware/model).
- Tip: when contacting support for a specific app crash or abnormal function, providing these versions helps quick diagnosis.
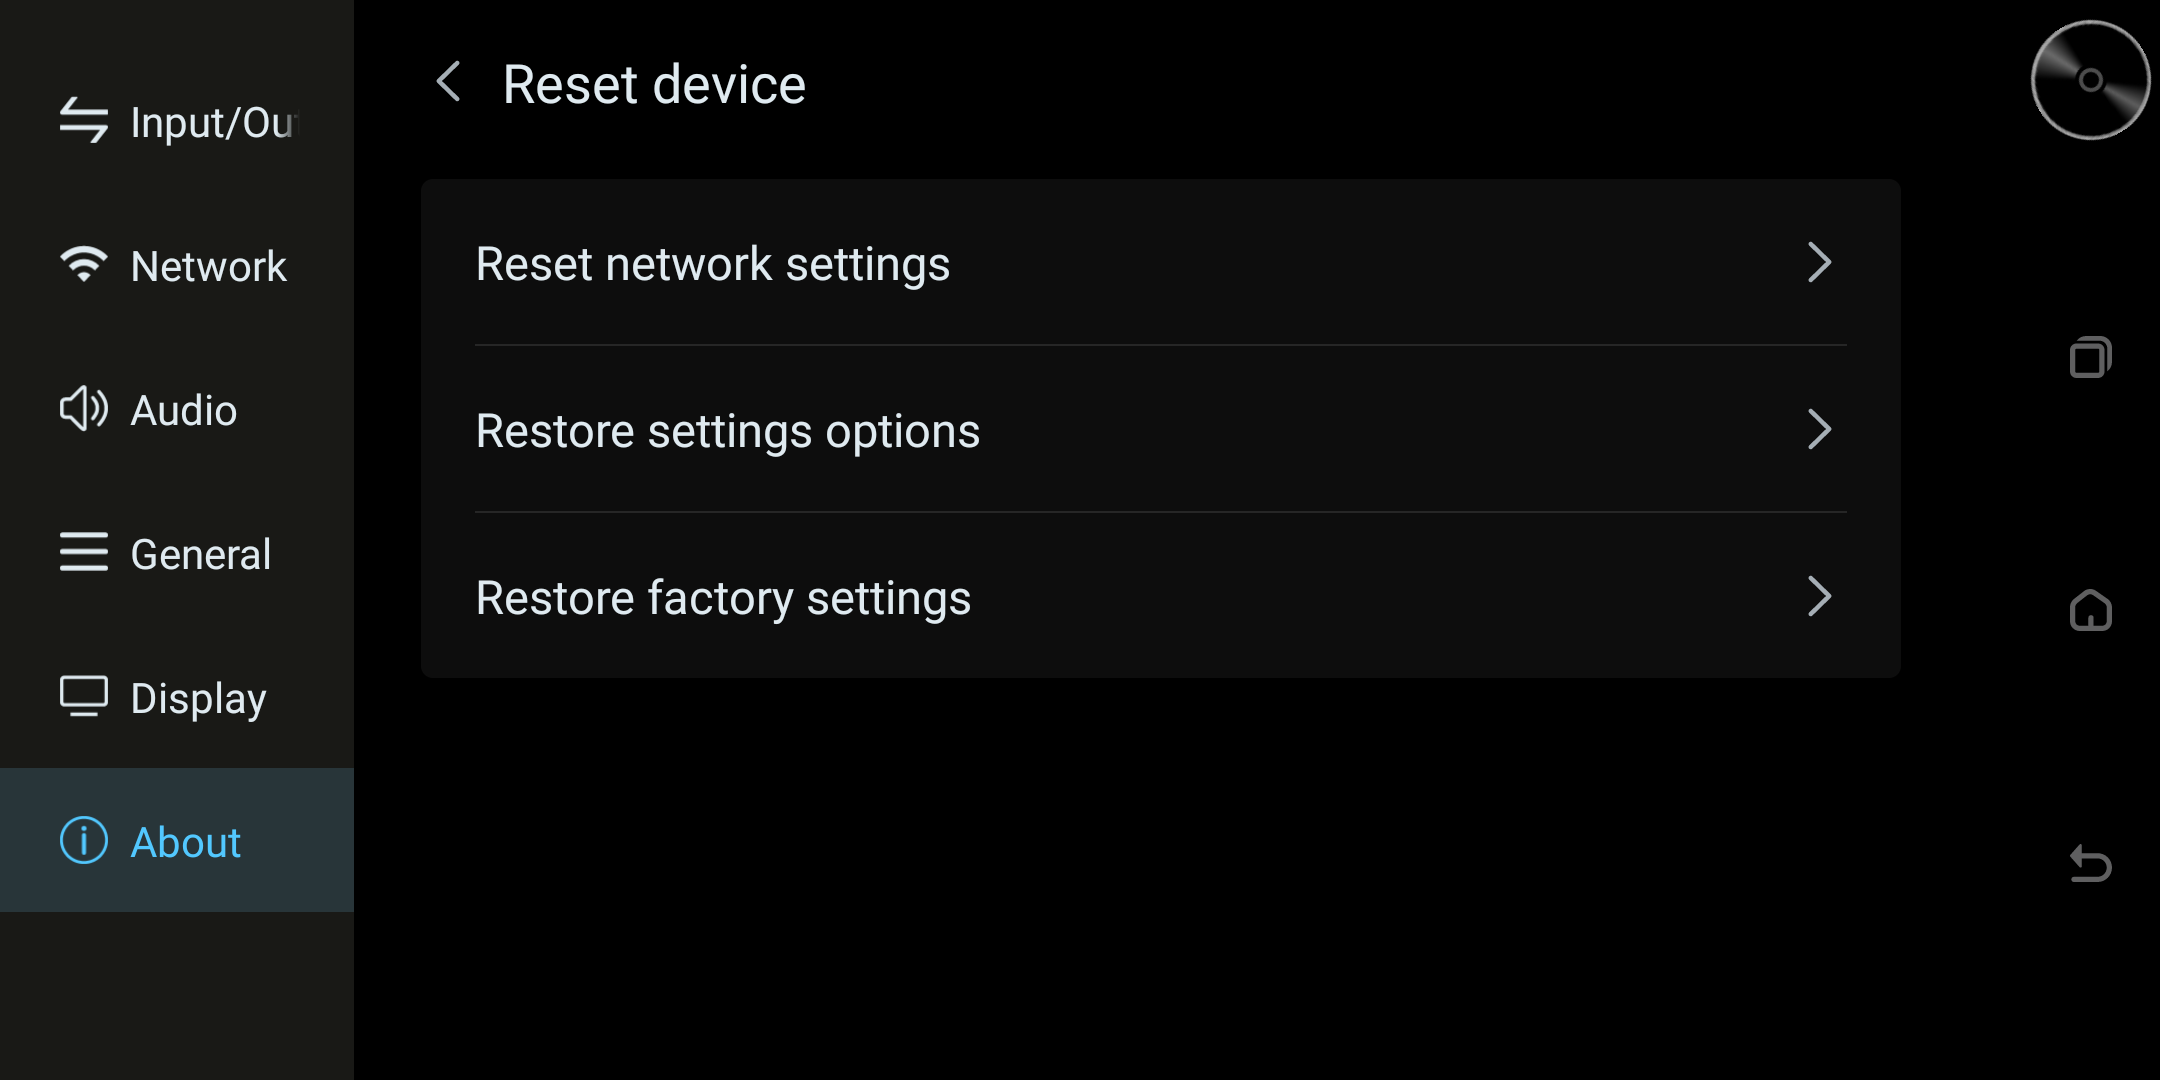
Factory Reset (Important Maintenance)
Tap the bottom "Factory Reset >" button to enter a warning screen (screenshot: About-4). Resets the device to initial state.
⚠️ Core Warnings & Steps
- Data wipe scope: this permanently deletes all data in internal storage, including:
- all settings and caches of system apps;
- all third-party apps you installed;
- music files, photos, and other user data saved in internal storage.
- ❗ Key safety tip (read): "Before factory reset, unplug all external storage devices!" — to prevent accidentally deleting precious music on external HDDs/USB drives, physically disconnect all external USB HDDs or cards before confirming.
- Execute: after confirming backup and unplugging externals, tap the bottom blue "Factory Reset" button. The system reboots and resets; do not power off during.
💡 Usage tips:
- Daily: periodically tap "Check Update" to stay current for new features and bug fixes.
- Troubleshooting: if the device lags severely or apps error frequently and reboot doesn't help, try "Factory Reset".
📝 User Practical Tips
For the best experience and sound quality:
🔌 Connection & Mode Switch (Critical!)
- USB drive not recognized? Check General > USB Function Switch. For USB drive, external HDD, or external decoder, set Host mode; switch to OTG only when copying from a PC.
- Phone app cannot connect? Ensure the phone and player can reach each other on the same local network. A wired player and a Wi-Fi phone can connect when their networks are bridged and client isolation is disabled. With DHCP, the player IP may change after reboot; check the current address in Network.
🎧 Best Sound Quality (Hi-Fi Settings)
- Set Digital Volume Pass-through only when appropriate: in Audio settings, enable fixed digital volume after confirming that the complete output chain supports it and no processing is needed. Control level on the rear amplifier or DAC, starting low and raising it gradually.
- DSD playback setting: if your external decoder supports native DSD, set DSD mode to Native. If it only needs to make sound (no DSD support), choose D2P (to PCM).
- Screen-off listening: in Display choose Screen Off screensaver — protects the screen and minimizes internal EMI for cleaner black background.
💻 PC Connection & File Transfer
- PC USB playback no sound / wrong sample rate? For DAC use, connect the PC via the rear USB-B square port (printer-cable shape). If playing hi-res but screen shows 44.1 kHz, check the PC/tablet playback software's output settings and driver.
- Wireless transfer tip: Windows users are recommended to use SMB share (enter
\\device-IPin File Explorer) — like managing a local folder, faster than browser upload.
⚠️ Safety Warning (Read)
- Before factory reset: unplug all external USB drives or HDDs! Although the system mainly clears internal storage, physically disconnecting is the safest way to prevent accidental loss of precious external resources.